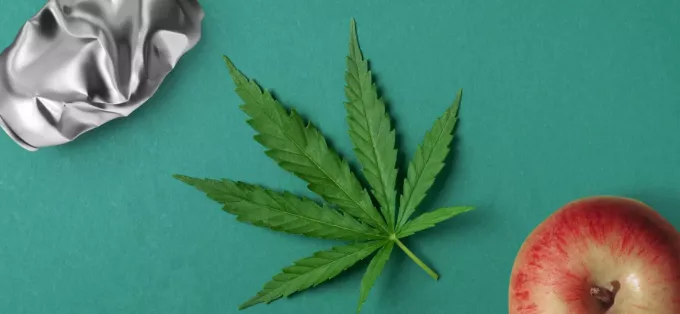
How to make an apple bong: It’s a question that’s plagued man for centuries. People always say, an apple a day keeps the doctor away. But now, you don’t have to eat the apple, you can use it to get stoned out of your mind! If you need a break from your delta 8 vape and are looking for a cheap, delicious way to get high as a kite, look no further than our guide on how to make an apple bong.
What Is an Apple Weed Pipe?
An apple weed pipe, or apple bong, is as simple as it sounds. It’s a fresh apple with a bowl at the top, and tunnels inside for ventilation and smoke flow. They’re super simple to make but are only good for about one smoke session (ever left a half-eaten apple on your counter too long?).
An added benefit of smoking from an apple bong is the taste. Some people claim that smoking from an apple will give the smoke a nice, cool apple flavor, transforming your weed experience from good to gourmet.
How To Make an Apple Bong (AKA Apple Pipe)
An apple bong, or apple pie, is one of the simplest DIY weed-smoking options out there. All you need is a fresh apple and something to bore holes in it. Most people use a ballpoint pen, but if you’re particularly handy, a power drill could make the job even easier.
Making a bong out of an apple is as simple as creating a bowl, or a spot for your bud to sit, and digging a channel for the smoke. It's as easy as (apple) pie! You’ll be riding a cloud in no time, and we guarantee your bong never tasted so good.

How To Make An Apple Bong - the Step-By-Step Guide
Here is our foolproof guide on how to make an apple bong. Good luck!
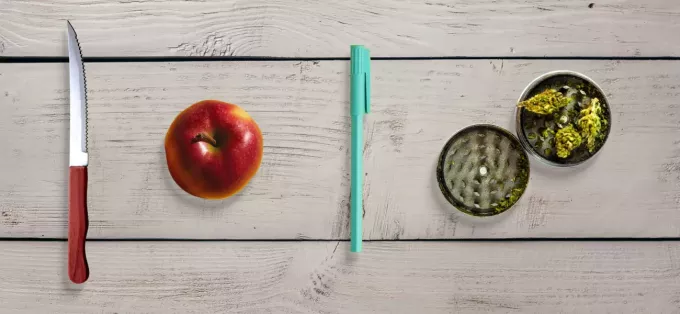
1. Gather the Supplies
Thankfully, the supply list is pretty short. All you’ll really need is a ballpoint pen, a knife, and a fresh apple, plus whatever you’re smoking.
2. Prep the Apple
First, inspect your apple, and make sure it’s crisp, fresh, and clean. You won’t want to use one that’s full of mushy brown spots. An apple that’s too soft could collapse when you’re trying to bore holes in it, so make sure it’s nice and firm! This is optional, but if it’s a particularly waxy apple, consider scrubbing it to remove the waxy outer layer. This will ensure you’re not getting anything besides weed and apple in your smoke!
3. Twist Off the Apple's Stem
Next, simply twist and pull the stem from the top of the apple, leaving a dip at the top. This will eventually serve as your weed bowl.
4. Carve Out the Bowl
Then, using a knife or a spoon, dig some more of the flesh out where the stem used to be, to create your ideal bowl. Make sure it’s deep enough to hold a good amount of weed!
5. Create the Mouthpiece and Carb
Here’s where it gets interesting. Using a ballpoint pen with the ink tube removed, dig a channel that starts on one side of the apple, about halfway down. Keep digging until your pen pokes out the other side of the apple. You should end up with a channel that runs completely through the apple. One end of this tunnel will be your mouthpiece, and the other will be your carb.
6. Connect the bowl and mouthpiece
Remember the bowl that you dug at the top of the apple? Now, with the precision of a surgeon, dig another hole starting at the bottom of your bowl, that connects to the tunnel you just made through the apple. You should now have a complex series of tunnels that run through your apple. And with that, your apple pipe should be ready to smoke!
7. Testing Your New Apple Bong
Make sure to test your apple bong before attempting to smoke out of it. Pick one of the holes on the side to be your mouthpiece, the other will be your carb. Place a finger over the carb, and inhale through your mouthpiece. You should be able to suck air from the bowl, through the mouthpiece. Remove your finger from the carb. Now, when inhaling, air should be coming through both the bowl and the carb. If your stoner HVAC system works, you’re ready to go!
8. How To Use Your New Apple Bong
To use your new apple bong, you’ll put weed in the bowl at the top, cover the carb, and inhale through the mouthpiece while lighting your bud. When you’re ready for a good puff, take your finger off the carb and blast off!
9. Pack a Bowl
Make sure your herb is ground enough to light effectively, but not too fine and/or dry that it falls right through the bowl. You’re looking for that sweet spot where the weed burns nicely but forms a nice, secure bowl that stays in place.
10. Smoke It
This is what you’ve been preparing for! Pack your perfect bowl on the top of the apple, and smoke it just like a pipe. Make sure to use the carb to build up a good puff, then release to inhale a thick, fruity cloud. Congratulations, you now know how to make an apple bong!
Why Should I Make An Apple Bong?
The biggest selling point of the apple bong is its convenience. If you’re looking up “how to make an apple bong,” chances are you’re stuck in a pinch, without any other way to smoke. The apple bong is there for us when we need it the most. It’s the hero we need, but don’t deserve.
Another benefit of the apple pipe is the stealth factor. You can carry one around with you, and from afar, it just looks like a normal, everyday apple. And when you’re done smoking, if you need to hide the evidence, just eat it! It might taste a little funky, but it’s still an apple.
Are Apple Bongs Safe To Use?
Apple bongs are just as safe as any other smoking device, be it bong, bubbler, or blunt. There’s nothing in an apple that could give off any toxins or chemicals when burned, so smoke up!
That being said, an apple bong is likely only good for one smoke session – maybe two if they’re back-to-back. After that, the apple will start to decay and get mushy, and that’s gross, man.
Making a Homemade Smoking Bowl With Everyday Items
We’re here to teach you how to make an apple bong. But, here are some other options for homemade pipes and bongs!
Water bottles
An empty plastic water bottle is another easy way to make your very own DIY weed pipe. Simply line the mouth of the bottle with aluminum foil, creating a small bowl. Then, poke ventilation holes in the foil (5 or 6 should do the trick!). Create a small hole in the side of the bottle to act as a mouthpiece and another even smaller hole for the carb. Fill the bowl with your herb of choice, cover the carb with your thumb, light, and inhale to fill the bottle with smoke. When you’re ready for the smoke, remove your thumb and keep inhaling!
Cans
Empty aluminum soda can makes a great smoking device in a pinch! Because of its flexible nature, it’s easy to bend and shape a can to fit your smoking needs.
To make a DIY pipe out of a soda can, you’ll first need to remove the tab from the top of the can. Then, turn it on its side, so the can sits horizontally. You’ll need to partially crush the can to create a dip in the side, forming the beginnings of your bowl. Try to create a dip that’s deep and narrow enough to act as a bowl, so your herb doesn’t come tumbling out!
Then, use a small poking device, like a needle or pin, to poke a series of small holes in the bottom of your bowl. Make sure these holes are small enough that your weed won’t fall through into the can. You’ll need at least 5 or 6 good holes to create enough airflow to get a good hit.
Lastly, cut a slightly larger hole in a spot that’s comfortable for your thumb to rest. This will be your carb. Then, simply sprinkle some ground herb into your makeshift bowl, cover the carb, light up and inhale! When you’re ready for a good hit from your DIY soda can bong, remove your thumb from the carb and keep inhaling.
It’s important to note: that some people express health concerns about the toxins given off by burning an aluminum soda can. There’s not a lot of specific evidence to support this, but if you’re concerned, we recommend either pre-burning the bowl area of your soda can bong, or using sandpaper to scrape off the label, leaving only aluminum behind, prior to smoking.
Toilet paper rolls
The steamroller pipe, or toilet paper pipe, is perhaps the simplest DIY smoking method out there. To create your very own steamroller pipe, simply bore a hole in the side of the roll, about an inch from the bottom. This will be the location of your bowl.
Then, take a piece of foil and fit it inside the hole you’ve created, with a bit of depth, so you can hold enough weed to get a solid hit. Poke some air holes in the bottom of the foil, and your bowl is complete!
The next step is making the carb hole. Simply cut a smaller hole, in a spot where your thumb rests comfortably, and you’re done!
Finally, you’ll need to cover the bottom of the “pipe.” You can either create an end cap using more aluminum foil or simply cover the bottom with your hand while smoking, to prevent smoke from escaping. The end cap will go on the side of the toilet paper roll closer to your bowl, and you’ll inhale from the opposite end.
Now you’re ready to smoke! Simply fill the bowl with your herb of choice, cover the bottom end, block the carb with your thumb, and inhale as you light up. Remove your thumb when you’re ready for a huge cloud of smoke, and enjoy!
Mason jars
The mason jar bong, or jam jar bong, is arguably the most complicated of the DIY smoking devices. This one actually requires some tools, hardware, and a bit of know-how. But, if you do it right, you’ll end up with a much better-looking, more durable end result than you would with an apple, water bottle, or toilet paper roll.
To make a mason jar bong, you’ll need:
-
A mason jar (obviously!)
-
Power drill
-
Narrow plastic tubing
-
Wrench socket
-
Fine mesh screen
-
Hot glue gun
First, drill two holes in the lid of the jar, on opposite sides of the lid. These holes will need to be big enough to fit your tubing. A knife can also be used for this step, but a drill will give you a much more even and smooth hole, which lowers the risk of slicing up your tubing (or your hand!). Finally, drill a third, smaller hole somewhere on the lid, to act as your carb.
Pick one of your tube holes, and insert a piece of tubing that’s a few inches long. This piece should reach about an inch into the jar, and several inches out of the jar. This will act as your mouthpiece. Then take another piece of tubing and insert it into the other hole, reaching close to the bottom of the jar. This piece should just sit in the hole, without sticking out the top of the lid. Seal both of these pieces with your hot glue gun, to prevent leaks.
Finally, insert your wrench socket into the piece of tubing that sits lower in the lid. Seal this with silicone as well. This will act as your bowl, so cut a piece of screen to an appropriate size and shape to sit in the socket to act as a filter.
Congratulations, you’re ready to smoke! Fill your bowl with your sticky of choice, and get ready to blow some thick, Pinterest-style clouds.
Check out this chart, comparing the different DIY pipe methods, so you can decide which is right for you.
|
Type of Homemade Bowl |
Apple Bong |
Water Bottle Bong |
Soda Can Pipe |
Toilet Paper Roll Pipe |
Mason Jar Bong |
|---|---|---|---|---|---|
|
Difficulty |
Easy |
Easy |
Medium |
Easy |
Difficult |
|
Reusability |
One use |
Several Uses |
Several Uses |
One use |
Many uses |
|
Cloud potential |
Moderate |
Big |
Moderate |
Big |
Huge |
|
Cost |
Low |
Very low |
Very low |
Free |
Medium |
Other Fruits and Vegetables You Can Use To Make a Bong
You’re here to learn how to make an apple bong, but these other fruits and vegetables should also work as a homemade smoking rig. Remember, all you need is a bowl, a carb, and a mouthpiece. The sky’s the limit!
-
Oranges
-
Bananas
-
Carrots
-
Peppers
-
Pineapple
-
Melon
-
Gourd/Squash
-
Pumpkin
-
Potato
How To Make An Apple Bong - Final Thoughts
Now that you’ve learned how to make an apple bong, the world is your oyster. As long as you have access to fresh produce, you’ll always be prepared for an impromptu smoke session, even if a pipe or bong is nowhere to be found. They say mankind’s original sin was eating the apple from the Garden of Eden, but they never said anything about using it to rip some fat clouds.